Meta Description: 5 Smart Printer Guide Tricks to Solve Paper Jam Errors fast — follow simple, step-by-step fixes to keep your printer on all guns firing and jam-free every time.
5 Tricks in Smart Printer Guide to Avoid Paper Jam Errors
Nothing is more maddening than hitting “Print” and hearing that horrible grinding noise. Your printer stops. A blinking light appears. And on the screen appear those dreaded words — Paper Jam.
It happens to everyone. At home, at school, at work. And for the most part, people either pull out the paper in the wrong direction or quit altogether and ask for help.
But here’s the good news: The majority of paper jams are completely fixable — by you, right now, with no special tools or training required.
This guide takes you through 5 printer hacks that other people swear by. These are tried and tested solutions that allow you to resolve paper jam errors quickly and even prevent them from occurring again.
Let’s get into it.
Why Your Paper Jams Keep On Happening (And Why It Is Normally Not Your Fault)
Before leaping to the fixes, it’s useful to understand why jams occur in the first place.
Paper jams aren’t random. They nearly always have a reason. And once you identify the cause, fixing it is much simpler!
Here are the most common reasons:
| Cause | What It Means |
|---|---|
| Wrong paper size | Paper doesn’t fit the tray correctly |
| Overfilled paper tray | Too many sheets cause bunching |
| Worn-out rollers | Rollers can’t grip paper properly |
| Damp or curled paper | Paper sticks together and misfeeds |
| Torn paper left inside | Old scraps block new sheets |
| Misaligned paper guides | Paper shifts sideways during feeding |
Most jams fall into one of these types. The printer guide tricks below address all of these root causes head-on.
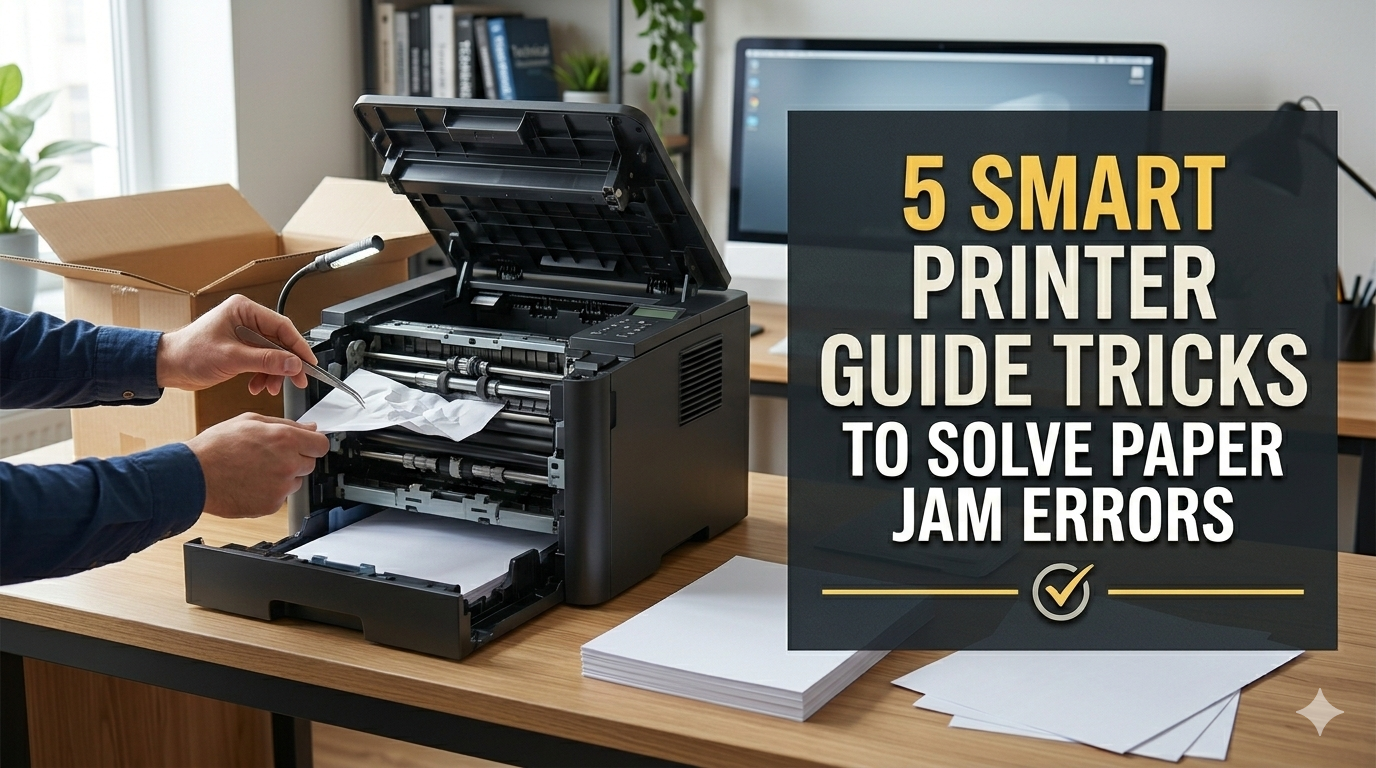
Trick #1 — Clear the Jam Correctly (Stop Yanking It Out)
What’s the number one mistake that people make? Yanking stuck paper out quickly and forcefully.
That feels good in the moment. But it can:
- Rip the paper into smaller pieces that remain hidden inside
- Damage the internal rollers
- Scratch or bend the paper path
- Leave fragments inside causing more jams later
The Proper Procedure for Extracting Jammed Paper
Step 1: Power down the printer completely. Power it down, not just pause it. That stops the rollers from spinning and tearing the paper even more.
Step 2: Open every access panel you see. The most common types are the rear door, front tray, and occasionally a side panel. Open all of them. You should be able to see the exact spot where the paper is jammed.
Step 3: Look before you pull. Use a flashlight if needed. Find exactly where the paper has jammed. Is it near the rollers? Near the output tray? Somewhere in the middle?
Step 4: Pull slowly and steadily in the direction that paper would normally go — which is forward toward the output tray. Never yank sideways or backwards.
Step 5: If the paper rips, stop immediately. Do not force it. Gently remove the rest of it with tweezers or needle-nose pliers. Make sure no scraps are left inside.
Step 6: Once the jam is removed, carefully run your hand through the paper path to check for any hidden bits. As little as a thumbnail-sized scrap can cause yet another jam.
Step 7: Close all panels, restart the printer, and run a test print.
Quick Tip
Many modern printers include a diagram displayed on the screen or app that reveals precisely where the jam exists. Always check that diagram first — it eliminates a lot of guesswork.
Trick #2 — Recalibrate Your Paper Guides Every Time
This one sounds almost too simple. But crooked paper guides produce a large percentage of recurring paper jams — and most people never think to check them.
Paper guides are the little plastic arms on the sides (and sometimes the rear) of your paper tray. It’s their job to keep the paper snugly in place so it feeds in a straight line.
If guides are even a millimeter off, the sheet is angled when it slips into the printer. That angle deepens as the paper proceeds. By the time it gets to the rollers, that sheet is crooked — and jams.
Setting Paper Guides Correctly
Here’s a straightforward process that takes under 60 seconds:
- Remove all paper from the tray completely
- Slide both side guides all the way out to the widest position
- Make sure your paper stack is neat — no bent corners, no curled edges
- Put the paper back in the tray
- Slide the guides in so they just touch the edges of the paper
- Don’t press them too tight — the paper should slide freely, not be pinched
The “pinch test”: Once you have positioned the guides, try wiggling the paper stack left and right. It should hardly budge — at most 1–2 millimeters. If it moves more than that, the guides are too loose.
Paper Guide Settings by Paper Size
| Paper Size | Guide Position |
|---|---|
| Letter (8.5 x 11 in) | Standard position — most common |
| Legal (8.5 x 14 in) | Extended tray + rear guide adjusted |
| A4 (210 x 297 mm) | Slightly narrower than Letter |
| A5 / Half Sheet | Both guides pulled in significantly |
| Envelope | Special envelope slot or narrow guide setting |
Be sure to adjust your guide setting according to your actual paper size. If your printer is set to print Letter but you loaded A4 — or the other way around — expect a jam.
Trick #3 — Fix Your Paper Before It Even Enters the Tray
Most people treat paper like it’s perfect no matter what. They pull a stack off the shelf, dump it into the tray, and hit print. But the condition of paper matters more than most people know.
Bad paper causes bad prints — and paper jams.
For more detailed printer troubleshooting tips and guides, visit Printer Troubleshoot Guide — a helpful resource covering all major printer issues and fixes.
The Paper Problems You Must Know About
Problem #1: Curled Paper Paper that was kept in a humid atmosphere will naturally curl. When it feeds into the printer curled, it catches on rollers and guides and causes jams.
Fix: Flex the paper gently in the opposite direction before loading. Hold a small stack and bend it back slightly — this straightens the curl.
Problem #2: Damp Paper Moisture makes paper sheets stick together. The printer attempts to grab a single sheet and instead pulls two or three. Those extra sheets pile up and cause a jam.
Fix: Keep paper in a sealed ream wrapper or dry storage container. If paper feels limp or soft, it has absorbed too much moisture — don’t use it.
Problem #3: Uneven Stack If your paper stack isn’t neat and even, sheets will misalign during feeding.
Fix: “Fan” the paper before loading. Grasp the short end and flick through the sheets like a deck of cards. This separates them and evens them out.
Problem #4: Mixed Paper Types Never mix paper of different weights or sizes in the same tray. A stack of ordinary 20lb paper with a handful of heavy cardstock sheets mixed in will jam almost every time.
Fix: Use one paper type per tray load. Whenever you need to print on a different kind of paper, do it in separate batches.
Problem #5: Overfilling the Tray Every paper tray has a max capacity line — typically marked on the inside of the tray itself. Exceeding it puts pressure on the lower sheets, causing them to buckle and jam.
Fix: Load only up to the max line. For older or cheaper printers, stay 10–15% below max just to be safe.
Paper Prep Checklist
- [ ] Paper is dry and not limp
- [ ] Paper is not curled or bent
- [ ] Stack has been fanned and evened out
- [ ] No mixed paper types or sizes
- [ ] Tray is not overfilled
- [ ] Paper matches the size selected in print settings
Trick #4 — Clean Out Your Printer Rollers (Most People Skip This)
Here’s a trick that few people do — but it makes a huge difference.
Your printer’s paper rollers have a slightly grippy rubber surface. That grip is what snags each sheet of paper and guides it through the printer smoothly.
Over time, that rubber collects:
- Paper dust
- Ink residue
- Tiny fiber particles from paper
- Skin oils from handling
When enough buildup accumulates, the rollers become slippery. They can’t grab paper reliably. Sheets slip, stall, or feed at an angle — all of which cause jams.
Cleaning the rollers is easy and takes about 10 minutes.
Steps to Clean Printer Rollers
What you need:
- A lint-free cloth (microfiber works great)
- Distilled water or isopropyl alcohol (at least 70%)
- A flashlight
- Tweezers (optional)
Step 1: Power off the printer and unplug it.
Step 2: Open the rear panel or access door to reveal the rollers.
Step 3: Moisten your cloth with distilled water or alcohol. It should be moist — not soaking wet.
Step 4: Rotate each roller by hand as you clean it with the cloth. You’ll likely see gray or brownish residue on the cloth — that’s the buildup coming off.
Step 5: Continue rotating and wiping until the cloth comes away clean.
Step 6: Allow the rollers to dry thoroughly — at least 10–15 minutes — before running the printer again.
Step 7: Plug in and power on. Run 3–4 test sheets to ensure feeding is smooth.
How Often Should You Clean Rollers?
| Printer Usage | Cleaning Frequency |
|---|---|
| Light use (1–2 times per week) | Every 6 months |
| Moderate use (daily printing) | Every 2–3 months |
| Heavy use (office, high volume) | Every 4–6 weeks |
| After a bad paper jam | Immediately |
If your printer continues to jam even after clearing jams and fixing the paper tray — dirty rollers are most likely at fault.
According to HP’s official printer maintenance guide, regularly cleaning your printer’s rollers is one of the most effective ways to prevent recurring paper feed issues and extend the life of your printer.
Trick #5 — Update Your Printer Settings and Driver (The Digital Fix)
This one catches a lot of people by surprise. But software problems can lead to physical paper jams more frequently than you might think.
Here’s the thing: your printer’s driver is the software that tells the printer how to process a given print job. If the driver is outdated, damaged, or misconfigured, it can send incorrect instructions — such as telling the printer to expect Letter paper when A4 is loaded, or setting a paper thickness that doesn’t match what’s actually in the tray.
The printer attempts to comply with those commands. The mismatch causes feeding errors. And feeding errors cause jams.
Fix #1: Update Your Printer Driver
On Windows:
- Open Device Manager (type it into the Start menu search)
- Find your printer under “Printers”
- Right-click and select “Update Driver”
- Choose “Search automatically for drivers”
Or visit the printer maker’s website (HP, Canon, Epson, Brother, etc.) and download the latest driver for your exact model.
On Mac:
- Go to System Settings → Printers & Scanners
- Remove and re-add your printer
- macOS will automatically fetch the latest driver from Apple’s database
Fix #2: Match Your Print Settings to Your Paper
This is the most frequently ignored setting. On each print job, make sure these settings are aligned with your actual paper:
| Setting | Where to Find It | What to Match |
|---|---|---|
| Paper Size | Print dialog → Paper Size | Actual paper in tray |
| Paper Type | Print dialog → Media Type | Regular, photo, cardstock, etc. |
| Print Quality | Print dialog → Quality | Draft, Normal, or Best |
| Tray Source | Print dialog → Paper Source | Which tray you’re using |
Even a slight mismatch — such as choosing “Photo Paper” when you have plain paper loaded — can confuse the printer’s feeding mechanism and result in jams.
Fix #3: Restore the Printer to Factory Settings
If jams keep happening and nothing else works, a full reset often clears firmware glitches that cause ghost jams — where the printer thinks there’s a jam when there isn’t one.
How to reset most printers:
- Look for a “Restore Factory Settings” option in your printer’s menu
- Or hold the power + cancel button together for 10 seconds (depends on model — refer to your manual)
- After reset, reconfigure your Wi-Fi and preferences
Bonus Section — Recognizing When to Stop DIY-ing and Ask for Help
These five tricks solve the majority of paper jam errors. But sometimes the issue runs deeper.
Call a technician if:
- The jam error message won’t clear even after removing all paper
- Your printer makes grinding or clicking sounds when attempting to feed paper
- The rollers appear cracked, hardened, or visibly damaged
- Your printer is older than 5–7 years and keeps jamming constantly
- There is ink or toner leaking inside the paper path
A professional cleaning or roller replacement is the better option at that stage — and more often than not, cheaper than buying a new printer outright.
Stopping Paper Jams Before They Happen
Fixing jams is great. But preventing them is better. Here’s a quick prevention checklist:
Daily habits:
- Never overload the tray
- Always fan paper before loading
- Match paper size in settings every time
Weekly habits:
- Check the paper path for debris
- Make sure guides are properly aligned
Monthly habits:
- Wipe down rollers with a lightly damp cloth
- Check for and install any printer driver updates
Yearly habits:
- Do a deep roller clean with isopropyl alcohol
- Have the printer serviced if it’s used heavily
Frequently Asked Questions
Q: Why does my printer continue to jam even with new paper? New paper isn’t jam-proof. Make sure you have fanned the paper before loading, the guides are set correctly, and the tray is not overfilled. Also verify that your print settings match the size of the paper you loaded.
Q: Should I yank out jammed paper? No. Fast pulls can rip the paper and leave bits stuck inside the printer. Always pull slowly and in the forward direction — the same way paper normally travels.
Q: How can I tell if my rollers need cleaning? If paper is feeding unevenly, slipping, or your printer is making unusual sounds during feeding, dirty rollers are most likely the cause. Regular cleaning every 2–3 months can prevent most feeding issues.
Q: Is it okay to use any cloth to clean the rollers? Use only lint-free cloths like microfiber. Regular cotton cloths leave fibers that cling to the rollers and make things worse. Never use paper towels inside a printer.
Q: My printer says there’s a jam but I can’t find any paper. What now? This is called a “ghost jam.” Try a full printer reset. Also check hidden areas — behind the duplex unit, under the cartridge carriage, and inside the rear access panel. Tiny torn pieces often get stuck in these spots.
Q: Does paper brand matter when avoiding jams? Yes, it can. Cheap or low-quality paper generates more dust and is less consistent in thickness — both of which increase jam risk. Mid-range brands designed for laser or inkjet printing (as applicable) noticeably lower clog risk.
Q: How can I tell what paper size my printer is set to? Open your print dialog on your computer before sending a job. The Paper Size setting is typically right there. Or check your printer’s LCD screen — most modern printers display the expected paper size on the home screen.
Wrapping It Up
Paper jams are annoying. But they’re nearly always fixable — and often preventable.
Here are the 5 smart printer guide tricks that give you everything you need:
- Properly clear jams — slow, steady, no force
- Reset your paper guides — each time you reload paper
- Prep your paper — fan it, check it, store it properly
- Clean your rollers — regularly, with the right materials
- Update your settings and driver — so software matches hardware
None of these require any special skill. None require expensive tools. They just take a few minutes of attention — and knowing what to look for.
Follow these steps consistently and you’ll spend far less time fighting your printer and far more time actually printing.